Author: katehartman

  • Workshop at LEMUR

    I’m teaching a new workshop at LEMUR next month. Here’s the details:

    Fuzzy Logic: Intro to Soft Circuits

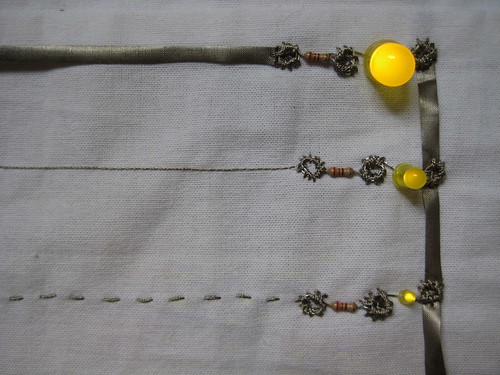
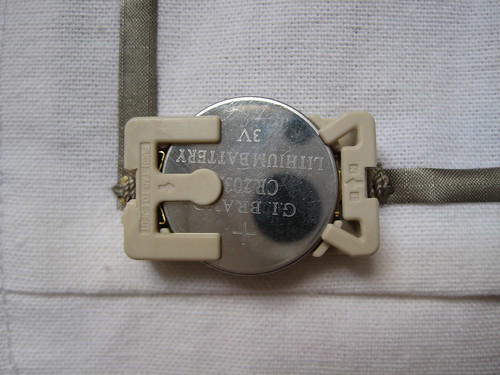
    Have you ever snuggled with a circuit? This workshop will provide an introduction to materials and construction techniques for creating soft and flexible circuits. Topics will include conductive fabric and thread, soft switches, iron-on circuits, sewing notions as electrical connectors, sewable LEDs, and the Arduino Lilypad. In addition, introductory electronics and sewing techniques will be reviewed. With basic soft circuit techniques in hand, students will have the opportunity to design and implement a final soft circuit on a garment of their choice.

    IMG_2887.JPG

    Dates: Saturday/Sunday 11/1, 11/2, 12:00-4:30 pm
    Cost: $350 including Lilypad, electronics and soft stuff
    Info on this & other classes can be found here.

  • An Evening with the Residents: The Aftermath

    Thanks to everyone who came out for the show! Here’s hoping there will be another one next year…

    [see the rest of the photos here]

  • An Evening with the Residents

    Please join us for a tasty feast of succulent experiments, delicious research, and exquisite projects served by the 2007-2008 ITP Resident Researchers, including works by:

    Gabriel Barcia-Colombo
    Jenny Chowdhury
    Rob Faludi
    Kate Hartman
    Jeffrey LeBlanc
    John Schimmel
    Demetrie Tyler

    ITP | Tisch | NYU:
    721 Broadway, 4th Floor

  • 5-in-5: Soft Circuit Sampler

    I had the pleasure of joining the ITP student-run 5-in-5 for as a guest for a day. Day 3’s fun and innovative projects included an adult Lite Brite, a dynamic map of the everchanging ITP floorplan, and a fabulous Processing-based rendition of the Brady bunch intro that included a blonde wig made of gaffer’s tape.

    For my project for the day, I created the beginnings of a Soft Circuit Sampler – a conductive textiles version of the traditional needlework sampler. According to Wikipedia:

    “The oldest surviving samplers were constructed in the 15th and 16th centuries. As there were no pre-printed patterns available for needleworkers, a stitched model was needed. Whenever a needlewoman saw a new and interesting example of a stitching pattern, she would quickly sew a small sample of it onto a piece of cloth – her ‘sampler’. The patterns were sewn randomly onto the fabric as a reference for future use, and the woman would collect extra stitches and patterns throughout her lifetime.

    16th Century English samplers were stitched on a narrow band of fabric 6-9in (15-23cm) wide. As fabric was very expensive, these samplers were totally covered with stitches. These were known as band samplers and valued highly, often being mentioned in wills and passed down through the generations.”

    I decided to do an interpretation of the band sampler and have the base cloth for my sampler be a long, narrow form:

    Since the idea with the sampler is to collect techniques as you learn them, this is just the beginning of a work in progress. The first example on it compares various soft conductors: ironed-on conductive fabric, as well as machine-sewn and hand-sewn conductive thread.

    Soon to be added are different insulation techniques, crimp beads with surface mounts components, as well as various connectors and switches. More pictures to follow!
  • Day 7: Window Ghosts

    For my 7th and final project, I collaborated with Gabe Barcia-Colombo on a video installation called Window Ghosts. I initially got the idea for it one night when I was leaving work, walking down Waverly, and looked up at the Tisch bulding to see to two people standing in a window. There was something eerie about the way they looked because they were high within the frame of the window and there was a curtain drawn close behind them. The overall effect was that it seemed as though they were floating.

    This, in combination with the realization that we have some prime, publicly-viewable, rear-projection real estate in the windows of the Resident’s office and the ITP conference room, made me want to create my own “window ghosts” – video projections of people that would stand at the window, passing the night by gazing at the street below.

    Gabe is my favorite projection expert and he knows all about projecting people in weird places, so it was a match made in heaven. On Saturday night we installed a single projection (thank you, John Schimmel, for your sleepless night at the window!), but we hope to further develop the installation so that it includes multiple projections and perhaps some other iterations. Don’t be surprised if you pass by some night and see my toes wiggling in the window, 5 feet tall!

    You can expect the final installation to be featured in the upcoming ITP Residents Show.

  • Day 6: The Elbow Detector

    For airplanes, elevators, and other tight spaces, the Elbow Detector is a wearable device that notifies you of the presence of another elbow so you can avoid that embarrassing moment of bumping elbows with a stranger.

    I have two variations in mind: the silent notifier (that signals the wearer with a small vibrating motor) and the alarm system (a more aggressive version that activates a buzzer when the elbows get too close).

    I made a rough prototype using the Arduino Lilypad, a Maxbotix Ultrasonic Rangefinder, and a Radio Shack buzzer mounted on an ever-so-elegant wrist band from American Apparel.

    Better documentation coming soon. It basically works, but here are some next steps:

    • Smoothing code. Right now I’m just doing down & dirty “if the sensor value is below X, then turn on the buzzer”, which obviously makes the buzzer a bit warbly.
    • A different form factor. Obviously a wrist band is meant to be worn on the wrist, not on the elbow. Might try working off of an elbow brace like this or else making a custom piece.
    • A different sensor. Though I am interested in proximity, the Rangefinder doesn’t provide enough resolution in the distance range that I’m interested in. Ideally, I’d like to be able to sense the difference between something being 1 or 2 inches away.
  • Day 5 (sort of): The Discommunicator

    Ok, so this is sort of a cheat, but I today I finally documented a prototype I made a while back. It’s called the Discommunicator. It’s a tool for communication that blocks conversation. It buffers words and enforces eye contact.

    Intended for heated discourse, the Discommunicator allows each person to say all the things outloud that shouldn’t actually be heard by the other person. The device is such that the two users are forced to look at each other so they are aware of the emphatic nature of what is being said, but the specific words are absorbed by the solid form they are being spoken into.

    For future prototypes, I’d like to make something a bit softer that also covers the ears so that it becomes a more immersive experience. This is one in a upcoming series of “limited communication devices”.

  • DAY 4.5: The Seasonal Salad Dress

    I’ve been thinking about making this dress for 5 years. Maybe 6.

    I got the idea when I was a professional sandwich- and salad-maker at the Garden Street Cafe in Rhinebeck, New York. Our mesclun came from Little Seeds (the local farm) in huge, clear bags. When a bag was almost done, I’d hold the it up, admiring the way the delicate, green leaves arranged themselves at the bottom. “Wouldn’t it be nice…” I thought to myself, “…if I could put ALL the parts of a salad in a bag like this, and make it into a beautiful dress. A salad dress!” I’ve been thinking about the idea ever since.

    I headed to the Union Square Greenmarket to get my veggies. I originally had a fancy and complicated salad in mind, but since it’s only mid-June, many of your favorite salad vegetables are not yet available locally. Instead of hitting up Whole Foods for additional ingredients, I decided to make this the Seasonal Salad Dress and just use that which could be acquired from nearby farms.

    Wash, chop, bag, seal, and voila! The Salad Dress is real!

    Materials: Clear trash bags, red & green leaf lettuce, carrots, radishes, red onions
    Tools: The Electro-Sealer

  • Day 3: The Boundary Belt

    The Boundary Belt is provides the wearer with the ability to produce a spontaneous boundary marker in the event of an ambiguous or misconstrued situation. With a press of the emergency release button (located on the belt), the boundary is immediately launched, clearly indicating to the approaching party where they are or are not welcome. The belt is adjustable – capable of generating boundaries for friends, strangers, and lovers. The video above depicts an initial prototype.